lunedì 13 giugno 2016

Volvo 850 front brake hose replacement

Since 21 years, for  my T-5R, it's a time to brake hoses replacement.

Below you can see old hoses with a lot of cracks.....  so a big risk of failure

On a car able to 240kmh it is better not to risk, especially as the price of the hose is few dozen of euro... I bought the hoses on skandix.com, you can see below the direct link
http://www.skandix.de/en/spare-parts/brakes/brake-hoses-pipes/brake-hose-front-axle-fits-left-and-right/1001236/

To do the replacement firstly jack up the front of the car and support it on a axle stands,  remove front road wheels (under any circumstances we don't  work under or aside of the car supported on a crick or hydraulic jack only)

At this time we must thoroughly clean any hose end junction


To do this we can use a brush or a not furry rag coiled around a small screwdriver, we spend a lot of time for cleaning in order to avoid any possible circuit contamination.

To avoid an excessive fluid spillage we can use this method:
Unscrew and remove the brake fluid tank cap
Top up the tank with new fluid
cover the filling hole with a piece of polythene  and secure it with a rubber band around the neck.

The best way is to unscrew the hose firstly at the pipe connection side, to do this we can use 14mm and 11mm spanner.

When the hose is removed plug the rigid pipe to avoid contamination

And remove the hose from the caliper with a 14mm spanner

Now, install the new hose on the caliper....

 And on the rigid pipe


Remove the piece of polythene and bleed the circuit in order to eliminate any air bubble

Sostituzione tubi freno Volvo 850

Dopo 21 anni di onorato servizio è tempo di sostituire i tubi freno della mia amata T-5R.

Come potete vedere dalle foto seguenti i tubi erano veramente malconci, la guaina esterna è vistosamente crepata e quindi il rischio di cedimento alto...

Su un auto da 240 all'ora non è proprio il caso di rischiare per una spesa di poche decine di euro, infatti i tubi anteriori, oltre che come ricambio originale Volvo si possono reperire su molti siti di ricambi a prezzi competitivi e con un ottimo standard di qualità, io per esempio li ho presi su skandix.com, ecco il Link:
http://www.skandix.de/en/spare-parts/brakes/brake-hoses-pipes/brake-hose-front-axle-fits-left-and-right/1001236/

La prima cosa da fare è togliere le ruote anteriori, ovviamente dopo aver sollevato la parte anteriore dell'auto sostenendola con due robusti cavalletti (mai lavorare sotto o a fianco di un'auto sostenuta soltanto dal crick o dal martinetto idraulico)
A questo punto occorre pulire accuratamente da ogni residuo di sporco i raccordi del tubo flessibile sulla pinza dei freni e sul tubo rigido.


Per la pulizia si può utilizzare un pennello e degli stracci aiutandosi se necessario con la punta di un piccolo cacciavite, ogni mezzo è lecito purché il risultato finale sia una PULIZIA COMPLETA e che nulla possa penetrare nei tubi.

Per evitare una eccessiva fuoriuscita di liquido freni durante lo smontaggio una buona soluzione può essere la seguente:
svitare il tappo della vaschetta
Rabboccare liquido fino quasi all'orlo
coprire il foro di rabbocco con una pellicola di cellophan (la classica pellicola per alimenti va benissimo) tenendola bloccata con un elastico arrotolato attorno al collo del foro di rabbocco.

La soluzione più comoda per rimuovere il tubo è svitarlo dapprima dalla parte del tubo rigido in modo che possa ruotare senza torcersi quando lo si svitera' dalla parte della pinza; per fare questo occorrono una chiave fissa da 14mm ed una da 11mm, quest' ulima meglio se del tipo apposito per smontaggio raccordi

Una volta rimosso il raccordo occorre tappare immediatamente il foro di uscita del tubo rigido in modo da minimizzare la fuoriuscita di liquido

Ora è possibile staccare il tubo dalla pinza freno

E rimontare il nuovo tubo, dapprima stringendolo dalla parte della pinza

 E poi dalla parte del tubo rigido

Una volta rimontato il tubo si può togliere il cellophan dalla vaschetta e, con l'aiuto di un assistente che preme il pedale del freno eseguire la procedura di spurgo del circuito utilizzando l'apposita vite di sfiato

domenica 5 giugno 2016

VIDEO tutorial sulla riparazione dei tachimetri VDO delle Volvo 850

Un amico proprietario di una Volvo 850 GLE desiderava sostituire il suo info display con la sola visualizzazione dell'orario e della temperatura con il più completo board computer che indica anche autonomia, velocità e consumo istantanei e medi.

Volvo 850 board computer

Le GLE normalmente montano un tachimetro Yazaky che non permette di installare lo strumento con le funzioni aggiuntive, per poterlo fare è necessario sostituire tutto lo strumento con un VDO che è invece predisposto per accettare il board computer.
Visivamente i due strumenti differiscono per la forma degli indicatori (3 strumenti distinti ed incassati nello Yazaky, mentre nel VDO tutti gli strumenti sono su un unico piano); tuttavia le connessioni col resto dell'auto sono identiche e quindi i due strumenti possono essere interscambiati.


Io avevo un quadro VDO, ma senza board computer, il contakm era rotto (classico problema dell'ingranaggio) ed i km visualizzati non erano quelli del mio amico, quindi ho dovuto smontarlo, ripararlo e portare i km indietro da 181.000 a 59.000.
Inoltre ho installato il board computer


Nel video che ho realizzato vedrete come ho fatto...
ecco il link a Youtube per visualizzarlo;
www.youtube.com/watch?v=YNZk-Pl-RS4
Buona visione!

VIDEO tutorial: Volvo 850 VDO odometer repair and board computer installation

My Friend own a Volvo 850 GLE and he wants to replace his standard info display (T° and clock only) with a most complete board computer (T°, clock, actual and average speed/consumption) normally installed on most luxurious version like GLT, T-5 and  "R".
Volvo 850 board computer

GLE versions, normally have a Yazaky cluster that not permit to install board computer; to do this the only possible way is installing a VDO cluster.
At first glance VDO and Yazaky differ for the instrument position (in Yazaky they are 3 different instrument separated from one and another, in VDO all instruments are placed in a single flat framework; nevertheless, linking connector are identical  for both, so the 2 instruments are interchangeable.


I have a VDO instrument, but without board computer, odometer is broken (classic gear issue) and km displayed are not correct, so had to dismantle and ripair it, and I had to e draw back km from 181.000 to 59.000.
Moreover I have installed board computer instead of classic display.


I made a video to exactly show you that I did...
here you are the Youtube link;
www.youtube.com/watch?v=YNZk-Pl-RS4
Enjoy!

lunedì 23 maggio 2016

che bell'alettone!

Finalmente siamo riusciti a montare l'alettone sulla T-5R di Gianni!

Direi che le foto non hanno bisogno di alcun commento...


a wonderful spoiler!

Finally we have succeeded to install the spoiler on Gianni T5R!

I think that the pictures don't need to comments...


lunedì 16 maggio 2016

a T-5 who wants to become a T-5R

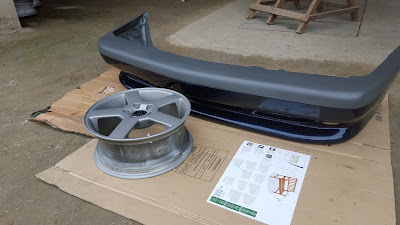
My friend Valentino wants to transform your 850 T-5 in a "R" model...Estetically, T5 and R differ in a few body details: anterior bumper with "lip", alloy wheels 17", and a strip over license plate painted.

"Lipped" bumper is discontinued since many year, the people who own one preserve it as a spare part for their "R", or alternatively sell it at extortionate price (500euro or more).
Luckily I own one; but it was in very very poor condition: a lot of deep scratches and stone shots


"Titan" 17"  wheels are a icons for 850 enthusiasts; on internet there are a lot for sale but almost ever they are in good condition.
In the following pictures you can see the condition of the wheels bought by Valentino.


It's a time to work!

1st STEP: sanding and major scratches repair

2nd STEP: a first coat of 2K primer

3rd STEP: small scratches reparation and sanding with 240 sand paper


4th STEP: a 2nd primer coat and final sanding with 320 e 500 sand paper

5th STEP: basecoat and clearcoat painting


6th STEP: rough plastic painting and final polishing


and now it's a time for the wheels:

1st STEP: big scratches reparation and first sanding with 240 sandpaper

2nd STEP: first primer painting

3rd STEP: small scratches reparation and final sanding with 320 and 500 sandpaper


4th STEP: for the final painting; I chose a polyurethane 2k half gloss paint  (metallic gray RAL 9007, 30 gloss); this color is a little more pale in relation to original paint, but I think that is better close to blue body. Polyurethane paint is more cheap and very simply to apply compared to normal body paint cycle (basecoat+clearcoat), however is less clear and not all colors are available, so that polyurethane paint is very suitable for accessories (wheels, rack etc...) painting but not for body painting.
Finally, the result is exactly how i wanted him:


:


AND NOW IT'S A TIME TO ASSEMBLING!


 Very nice this QUASI-"R"!!!!!